
If you want to anonymize your Internet traffic, one of the most common solutions available is to use a commercial VPN (Virtual Private Network) service.
A VPN allows you to establish an encrypted tunnel over the Internet, and have your traffic exit out of a server on the VPN network. This exit point is usually configured to be in another country.
Routing your traffic through such a service is what provides you with a certain level of privacy.
To prying eyes, your traffic will appear to be emanating from a server on the network of the VPN service, therefore masking your location and somewhat protecting your personal identity. (I say “somewhat” as VPN services can be compelled to reveal who their users are and this has happened in the past. You also need to take further steps to better anonymize your traffic beyond just a VPN service).
As more and more users are expressing concern over tracking and a desire to retain some privacy on the Internet, VPN services, once limited to the realm of IT savvy telecommuting employees, are now seeing increased adoption by non-IT users.
However, setting up a VPN on the myriad of devices that make up our typical home networks can be quite a challenge. There are some devices, such as smart TV’s, game consoles and setup boxes that do not support such a configuration, yet still reveal personal information through their use.
Most VPN services also have a limit to how many devices can connect, per account, simultaneously.
What is one to do?
One way to circumvent these limitations is to deploy the VPN service on the router itself.
This configuration provides a solution for all the devices you own. You no longer have to remember to turn your VPN on when browsing, as the tunneling takes place downstream.
Devices that do not support VPNs natively connect to the router as they normally would and still benefit from the added privacy!
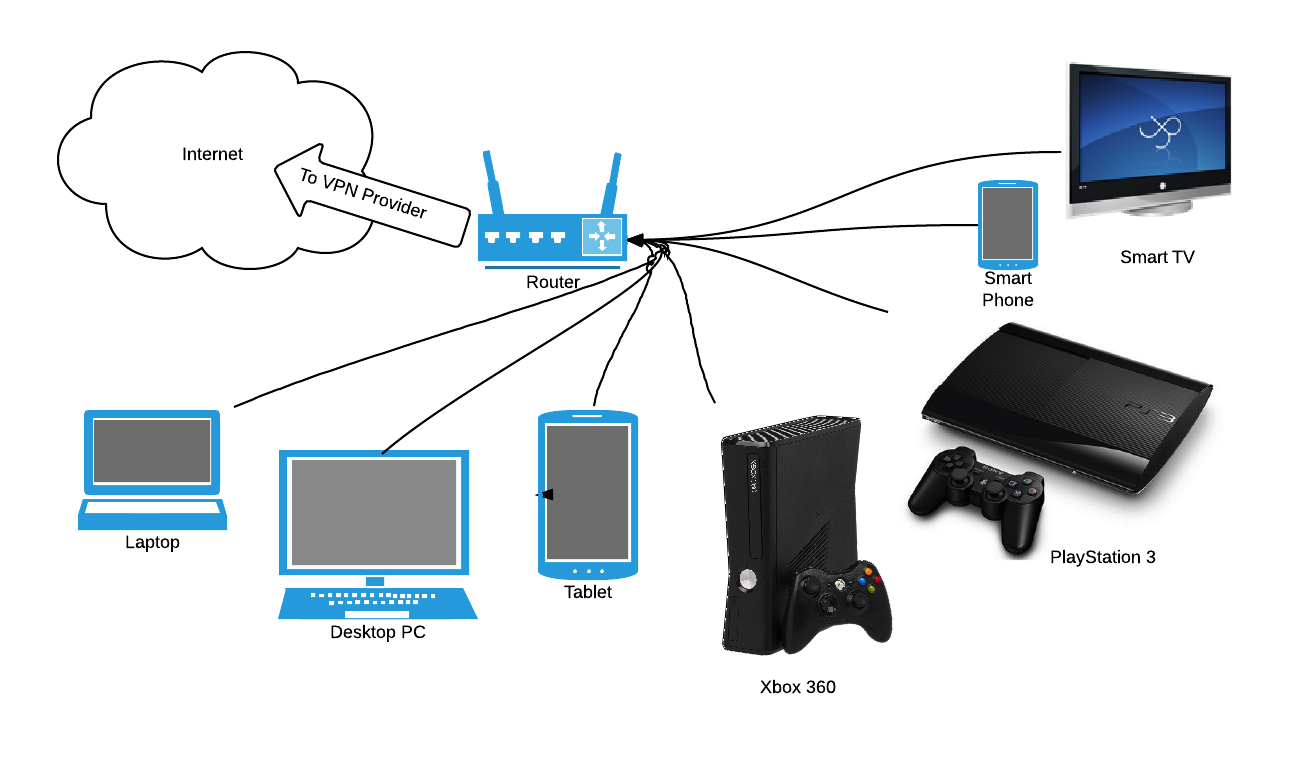
All the devices connect to the router, it handles the VPN tunnelling.
Most VPN services embrace this configuration and offer howto’s and step-by-step instructions on how to achieve this.
https://hidemyass.com/vpn/software/routers/ https://strongvpn.com/vpn_routers_new.shtml https://blog.ipredator.se/howto/openwrt/configuring-openvpn-on-openwrt.html
Some VPN providers even go further and offer the option to purchase a router pre-configured in this way, directly from them.
In fact, integrated VPN routers are gaining so much traction that there are now whole businesses cropping up that sell routers pre-configured in such a manner, independently of specific VPN services.
http://www.sabaitechnology.com/
If you’re feeling adventurous, or lack the funds, you can achieve this configuration with some technical chops, a bit of research, some judicious hardware choices, and a dash of luck. (and the willingness to buy the same router twice, after accidentally “bricking” the first one… ಠ_ಠ )
Let’s do it on the cheap…
The “howto” I choose was from the IPredator.se website, as they had a pretty comprehensive blog post explaining how to achieve this. They also used OPEN-WRT, a third-party firmware that I have had some previous experience with.
The router I chose was the Buffallo WRZ 450n. Checking on this page and this one too will help you determine what router would be a good choice, if OPEN-WRT is what your internal VPN setup will use.
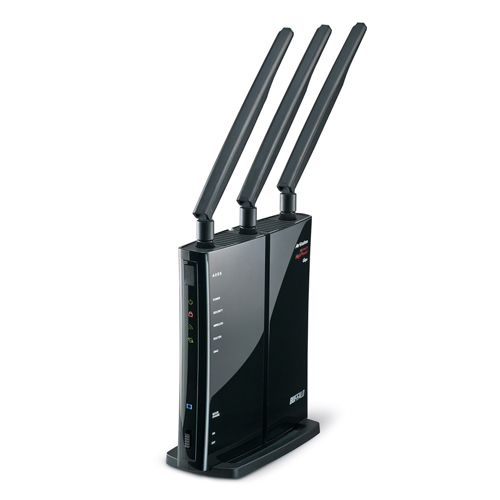
Ooooh! 3 antennas!
This router is old enough to have decent support, and current enough as to not be too obsolete.
How I came to this choice
I started by looking at Buffalo Tech, as they advertise DD-WRT capable routers right “out-of-the-box”. You can choose to use the default Buffalo branded firmware, or use DD-WRT, all with the manufacturers blessing. DD-WRT is a third-party firmware that gives users more options and features, some often only available in enterprise grade routers.
I figured if it can run a third-party firmware, there was a good chance OPEN-WRT would be supported as well.
After some cursory research, I was able to confirm that this was the case by looking at the path to the firmware for this router found on this page: http://wiki.openwrt.org/toh/buffalo/wzr-hp-g450h
The howto I was following specified that the “ATTITUDE ADJUSTMENT” branch of the OPEN-WRT firmware was the only supported version. I was also able to confirm this was available via the URL path to the firmware found in the above link.
This is important, as the version of OPEN VPN in “BARRIER BREAKER” was different enough to deviate from the howto and cause me huge headaches. (read: it didn’t work, also yay! I now have a spare OPEN-WRT BARRIER BREAKER only router).
My research also indicated this router has 32mb of flash, 64mb of ram and a 400mhz processor. These specs should be adequate for the additional demands of running OPEN VPN internally. Having a larger amount of ram will also enable you to download more packages from OPEN-WRT, through their package management system called OPKG. I suggest finding the same router as used by others, to help ensure greater chances at a successful attempt.
CAVEAT EMPTOR
There are also other factors to keep in mind. Manufacturers can sometime substantially change the internals of a router between revisions. These routers will look identical to their earlier revisions, yet might be completely incompatible with third-party software. Once you have it narrowed down to a model that offers the feature set you need, make sure to get the
exactsame hardware revision, and firmware revision, to avoid nasty surprises.
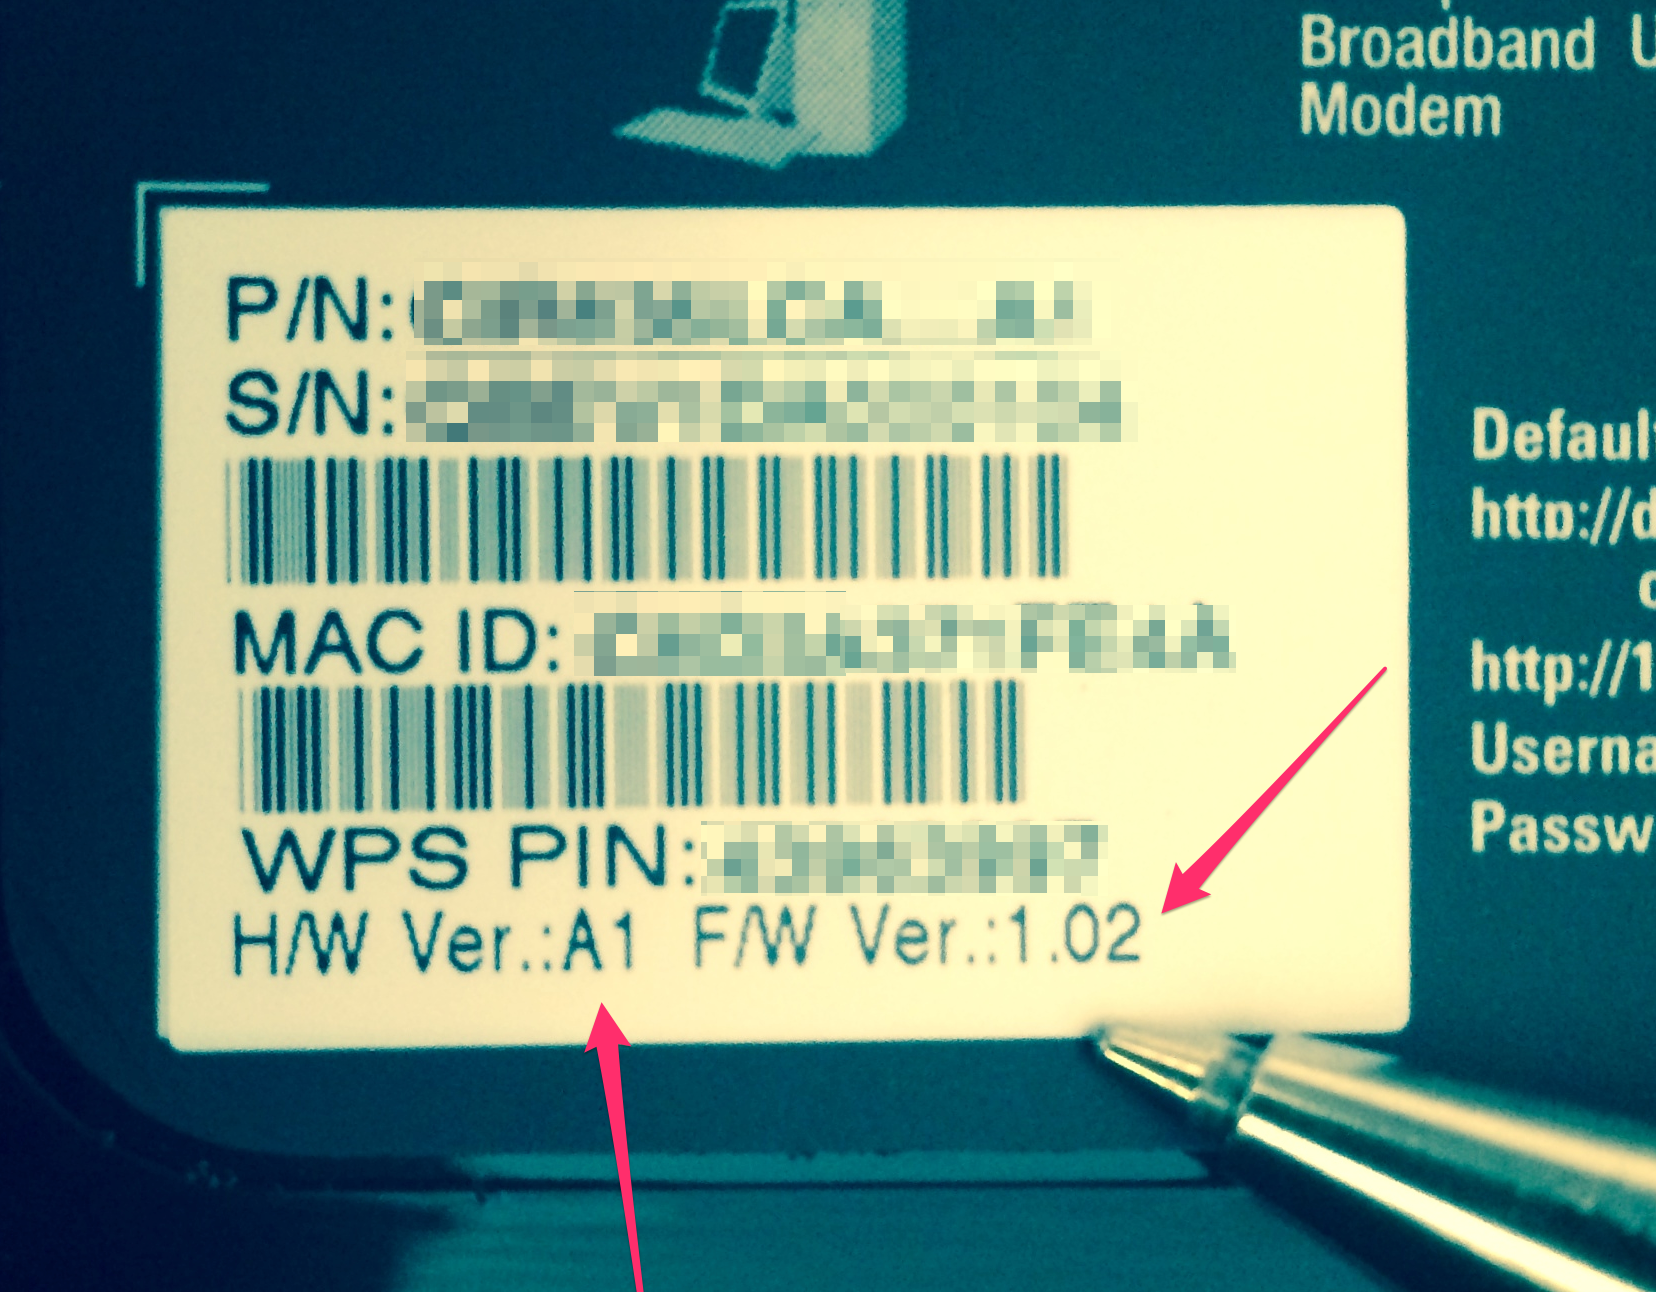
Pay particular attention to the hardware and firmware versions.
I was able to source a used Buffalo WZR-n450 at a local mom-and-pop computer store. If new is more to your liking, amazon is your friend: http://www.amazon.com/BUFFALO-AirStation-HighPower-Gigabit-Wireless/dp/B005CSOE1G/ref=sr_1_1?ie=UTF8&qid=1402348476&sr=8-1&keywords=n450+buffalo
This router had been reset to the factory defaults, so I proceeded to perform the standard setup, even if my end goal was to replace the firmware almost immediately.
Prepping the DD-WRT router for OPEN-WRT
After connecting the appropriate cables from my modem to the router (WAN), and from my laptop to the switch at the back of the router (LAN) I entered the Buffalo web interface, it is located at http://192.168.11.1 and accessed from a browser window.
I proceeded to follow the initial basic setup. You need to do this, as SSH access will not work without the router having a password assigned. I also enabled the SSHd service, and enabled local SSH administration, as both settings are additional prerequisites for SSH access.
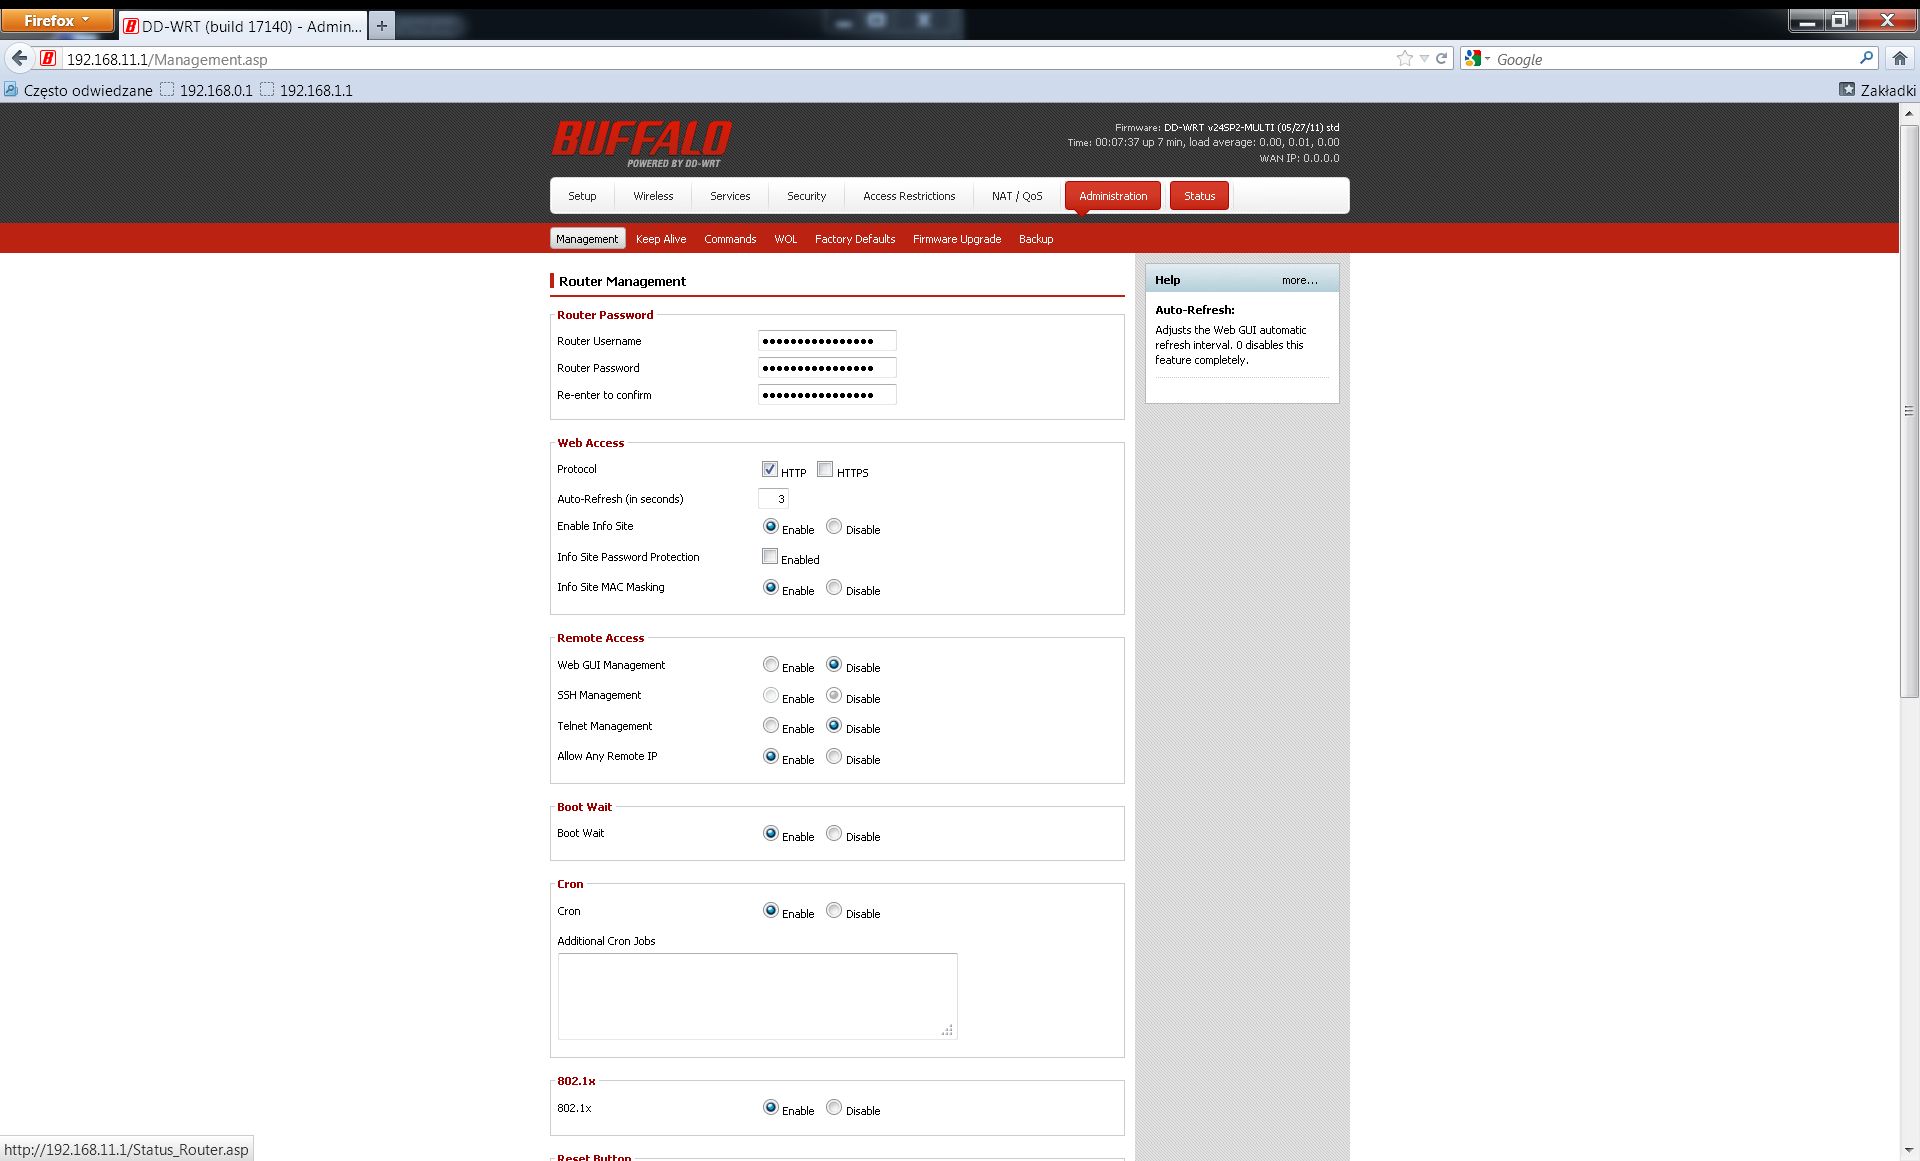
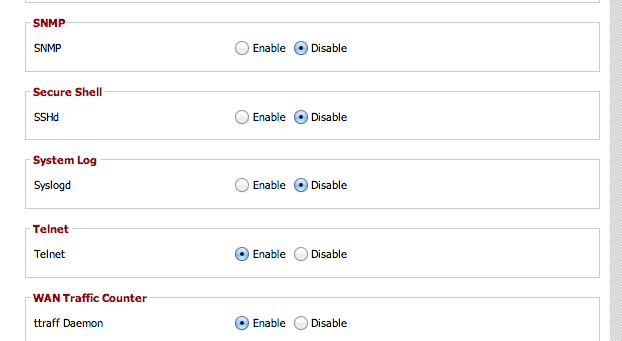
The SSHd service needs to be enabled too.
N.B. It is not possible to enable SSH administration without the SSHd service running on this router, (the option will be greyed out). Save yourself the headache, you will need both options enabled, otherwise connecting via SSH will not be possible.
Once both these option have been enabled, I was able to connect to the router. To connect via SSH in windows, you will need the trusty Putty program.
SSH access is natively supported if you’re connecting from the OS X console, or a bash terminal in Linux. (Alternatively, Penguinet is an excellent paid solution if you want something with more options than what Putty has to offer.)
When connecting to the router via SSH, you will use the same password as the one you created during the basic setup, albeit with the user “root” as opposed to “admin”. So for example, you would use root@192.168.11.1 to connect via SSH from a bash prompt.

DD-WRT access via SSH
Once you have connected to the router via ssh, issue these commands:
cd /tmp
This will change the directory to the /tmp folder. It is writeable, meaning you can save a file to it.
Then issue this command:
wget http://downloads.openwrt.org/attitude_adjustment/12.09/ar71xx/generic/openwrt-ar71xx-generic-wzr-hp-g450h-squashfs-sysupgrade.bin
This will tell the program wget to fetch the appropriate firmware and save it to the /tmp directory on your router. Remember, the above line only applies to the router I chose to use. You will need the proper path to the correct OPEN-WRT firmware for the router you have, if you selected a different one.
!!! WARNING, ENTERING POINT OF NO RETURN !!! Once you go further into this howto, you will make changes that are difficult to revert.
Once the wget command has completed, cross your fingers, hold your breath and issue this command:
mtd -r write openwrt-ar71xx-generic-wzr-hp-g450h-squashfs-sysupgrade.bin linux
This will overwrite the existing DD-WRT firmware with the OPEN-WRT firmware you need to get the VPN working on the router.
Now go take a coffee. Take my word on this one: Go. Take. A. Coffee.
Wait at least 20 minutes. This process will take a while. It will cause the router to reboot. It might even reboot more than once. Trust me, unless you want a shiny plastic brick, in the exact shape of a WZR-HP-n450 router, you’ll want to leave this one alone and only come back to it once its well and done.

Nice paperweight! Look forward to a howto on recovering from a bad flash!
Once the firmware writing process is complete, don’t freak out. OPEN-WRT is so configurable that it even lets you select what the front LED’s do.
This means your router will only have one green light on. Nothing is broken, it’s just not configured to blink lights for other things anymore.

Just one lonely light now.
You will now need to statically assign the IP address of the machine you are using to connect to the OPEN-WRT router to 192.168.1.2
The default IP address on OPEN-WRT is different than that of the default originally used by the Buffalo Tech router. Where 20 minutes ago it was 192.168.11.1, it now is 192.168.1.1.
Below is a screen capture showing where to statically assign the IP address in Windows 7. You change the setting by going to the control panel, selecting “Network and Internet”, then “Network Connections”, then “Local Area Connection”, then selecting the properties, followed by the properties of (TCP/IPv4), and finally “use the following address” and entering the aforementioned address.
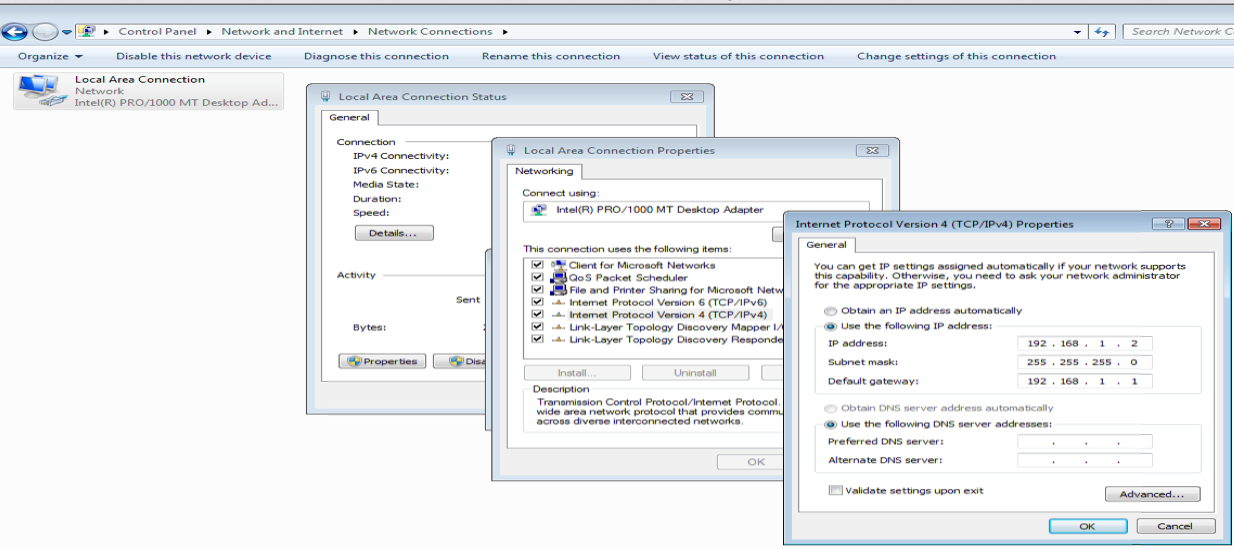
Where to statically assign the IP address in Windows 7.
openwrt.org describes how to login and chage your password here and Putty, Penguinet, or a bash prompt can again be used to connect to the router via the telnet protocol. You need to perform the password creation process before SSH access will work again.
Entering “passwd” at the prompt in your telnet session will allow you to create the root password.
Once you have set a password from your telnet session, you can disconnect, connect again, via SSH and begin. You read this correctly, only now are we actually going to start the OPENVPN installation described in the IPredator howto.
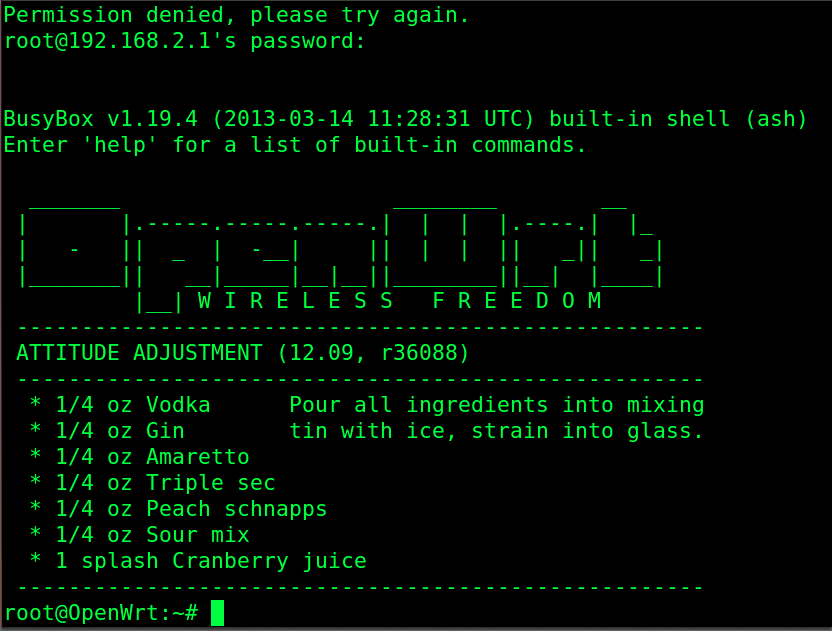
Accessing the OPEN-WRT enabled router via SSH.
Installing OPENVPN on OPEN-WRT
The IPredator howto I chose to follow is located here. Congratulations on making it this far, and here are some quick tips that will help make things easier, should something go awry.
- Pay particular attention to the network topology diagram in the howto. Your configuration may differ from it. It is helpful to understand how your network is configured as the IPredator howto assumes 2 networks, one unprotected, and the other routing through the VPN enabled router. Your configuration may differ, and this should be taken into account.
- When instructed to install programs via the OPKG package management system, I installed the nano command line text editor as well. Your router has enough room to accommodate it, and if you ever need to edit text files in VI, you’ll thank me for it. You can achieve this by issuing this command: “opkg install nano”. There’s an excellent tutorial for nano located here.
- The IPredator howto relies on “cat” and the “>>” operator to modify and create configuration files. I found it easier to have the text from the howto copied in a notepad document prior to making the changes, rather than copying the commands directly from their web page . This was easier in my case, as the “cut-and-paste” feature in Putty is a little counter intuitive. I also used this tutorial to familiarize myself with this procedure. If you’re doing these from bash, use the highlight, right-click copy and right click paste method. OS X simplifies it even further by enabling the “command+c” and “command+v” feature, allowing you to paste directly in the terminal.
- The howto modifies 2 core system files: “/etc/config/network” and “etc/config/firewall”. I thought it wise to have a backup copy of these. I achieved this with: “cp /etc/config/network /etc/config/network_bak” and “cp /etc/config/firewall /etc/config/firewall_bak”. This way I can revert the changes by removing the “_bak” and return the router to a basic OPEN-WRT configuration, should I so desire.
- OPEN-WRT does not come with a GUI (Graphical User Interface). There is one available called “luCI” and it can be installed using OPKG. A link on how to do this is available here. With luCi you can also re-enable the front LED and even assign them new functions. (Hooray blinkies!) I found it useful for monitoring the flow of traffic once everything was working.
Hopefully this tutorial on how to install OPEN-WRT will be useful to the people wanting to deploy a router with internal OPENVPN functionality.
It may be very particular to my specific deployment, but it has been my experience that I usually gleam information from several other howto, or blog posts, some drastically different to that which I wish to achieve, yet still containing valuable information.
@jean_taggart